The Science of Married
Links
  • Blog
  • About Me
    • The Condo
    • Old Married Blog
    • Old Teaching Blog
  • Wedding
    • Engagement Pictures
    • Wed - Getting Ready
    • Wed - Ceremony
    • Wed - Bride & Groom
    • Wed - Wedding Party
    • Wed - Reception & Photo Booth
    • Wed - The Little Details
    • Honeymoon Pictures

Painting the Front Door

9/10/2014

2 Comments

 
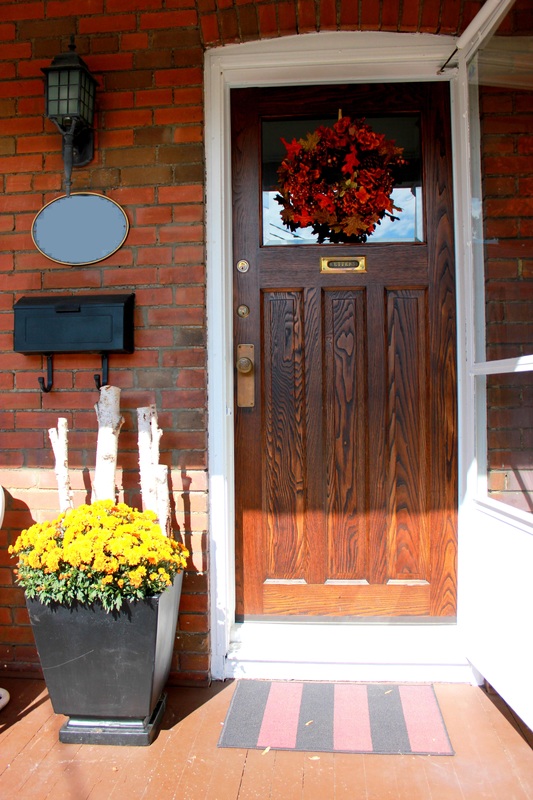
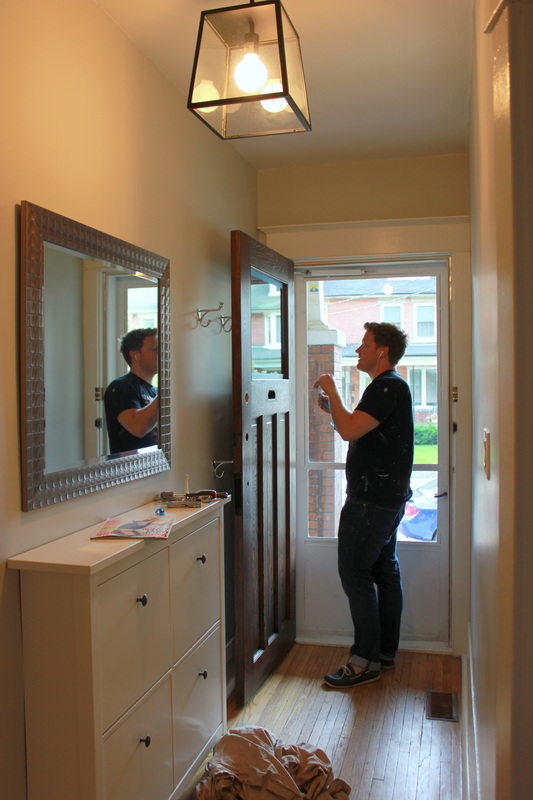
For the longest time I've wanted to paint the front door.  It's a nice solid oak, and I love the knots and veins, and I didn't want to lose them.  We decided to go for it, and here are the pictures:
Picture
Before: old picture of the door from about 2 years ago
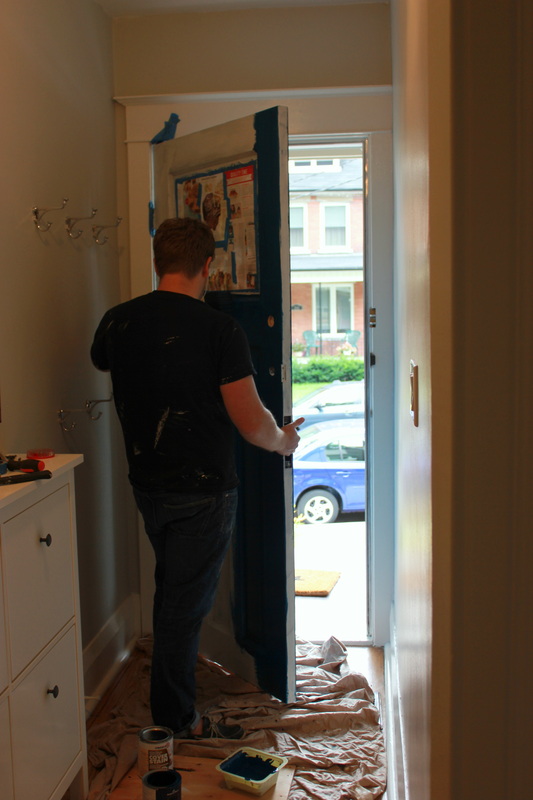
Picture
Taping it up
Picture
Removed all the hardware too
Picture
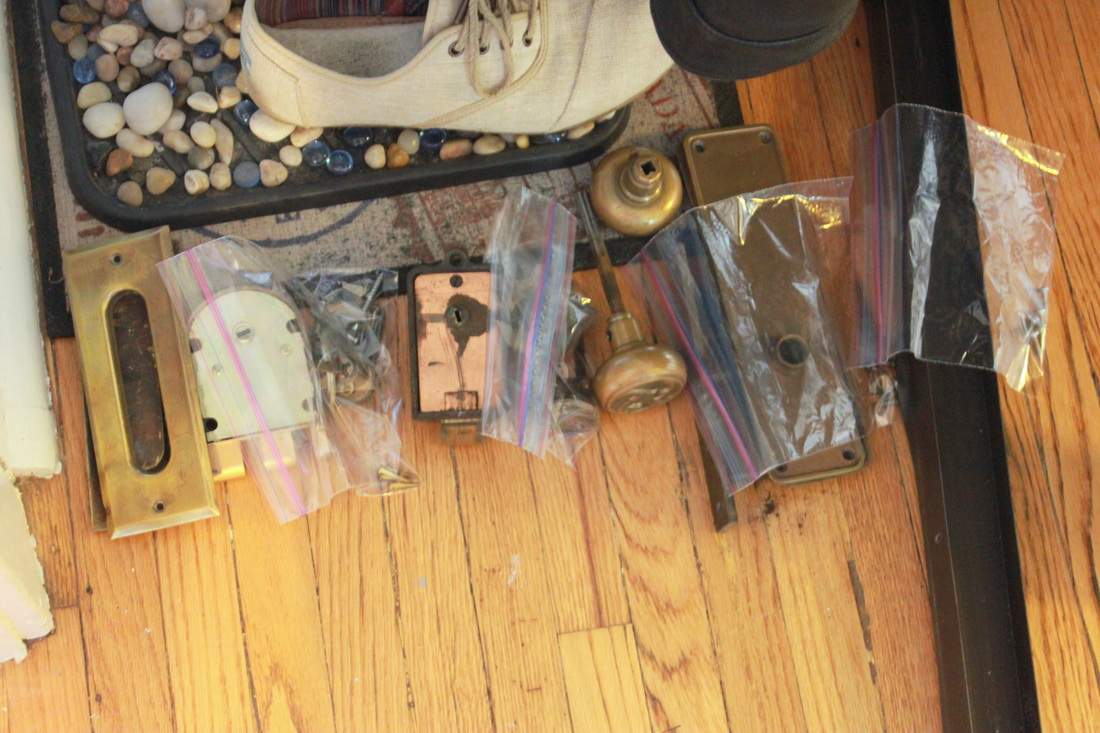
There was a lot...good ol' Toronto house with 2 locks on all doors.
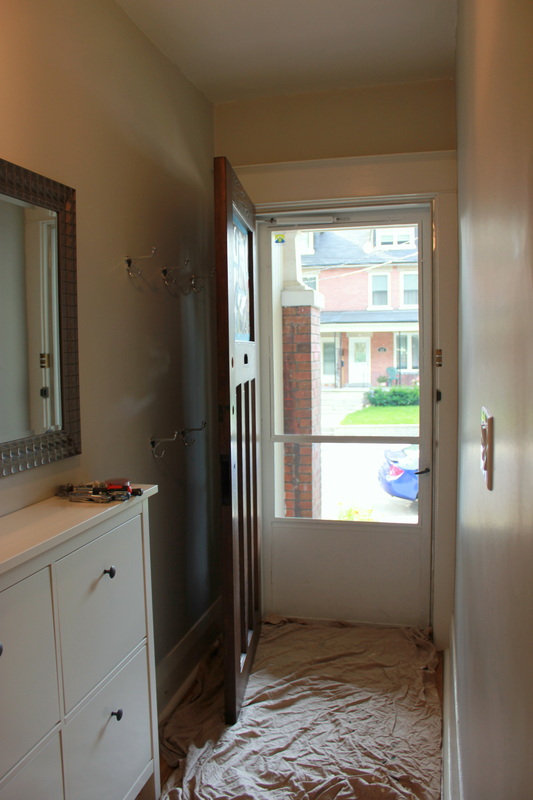
Picture
Ready to go!
Picture
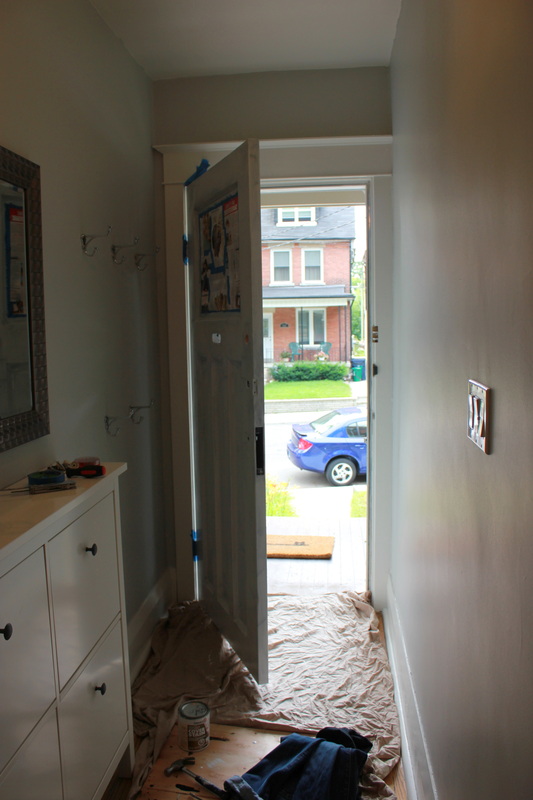
Primed!  We used an indoor/outdoor oil-based primer because it weathers better.  It stunk like crazy - I had to leave.  Luckily as soon as the first coat of latex was on you couldn't smell it anymore.
Picture
A few hours later and we were ready for our paint!
Picture
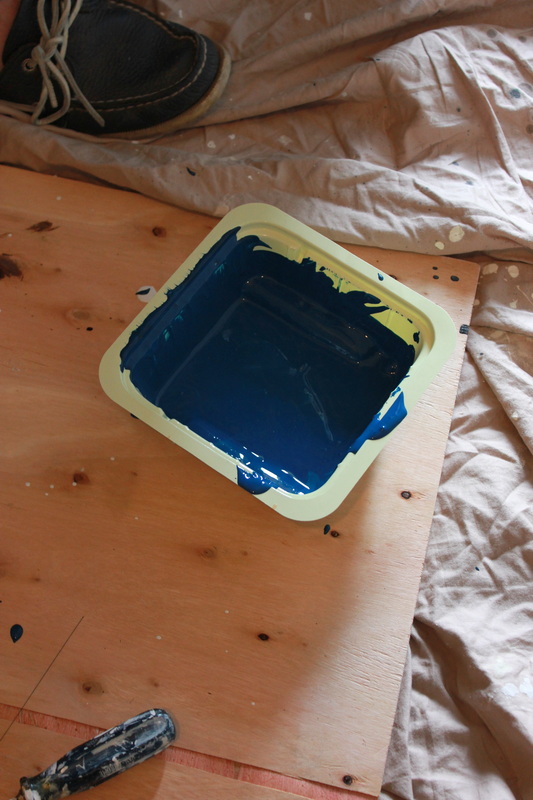
This is Benjamin Moore latex outdoor paint in Marine Blue - it has a glossy finish.  There are 3 levels of sheen for outdoor and you usually want something pretty glossy for the front door.  It makes it pop and it cleans well.
Picture
Okay this terrified me after 1 coat - it's NEON.
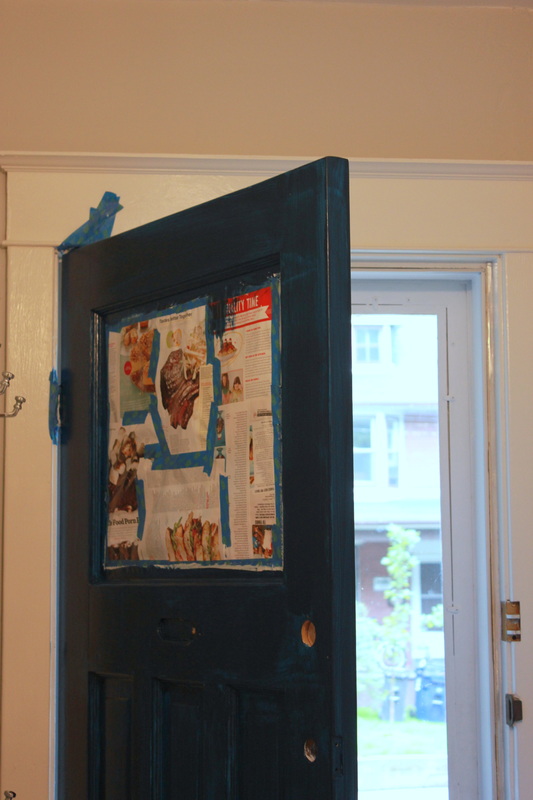
Also - like my old Women's health magazines used to tape up the window?
Picture
Definitely going to take a few coats!
Picture
Okay, now for the second coat, which was done the next morning.
We kept the door open with the screen closed until about 11 pm so it could dry as much as possible.
Picture
Second coat done - definitely going to need one more!
Picture
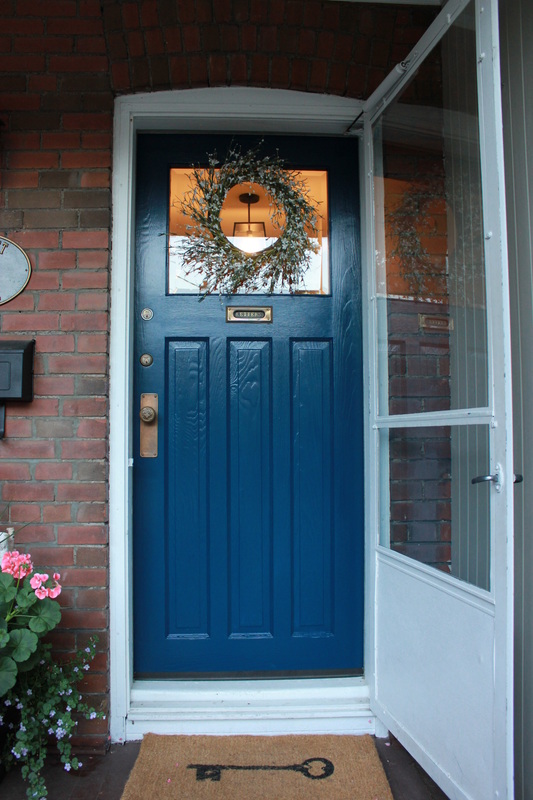
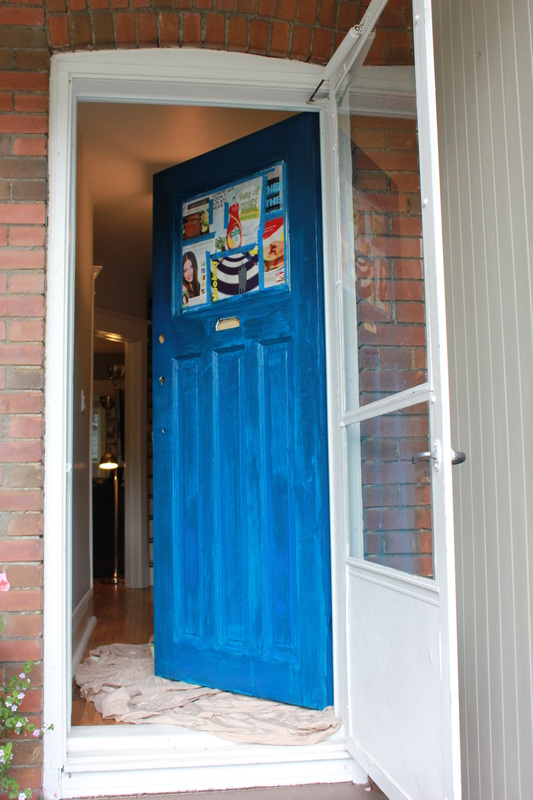
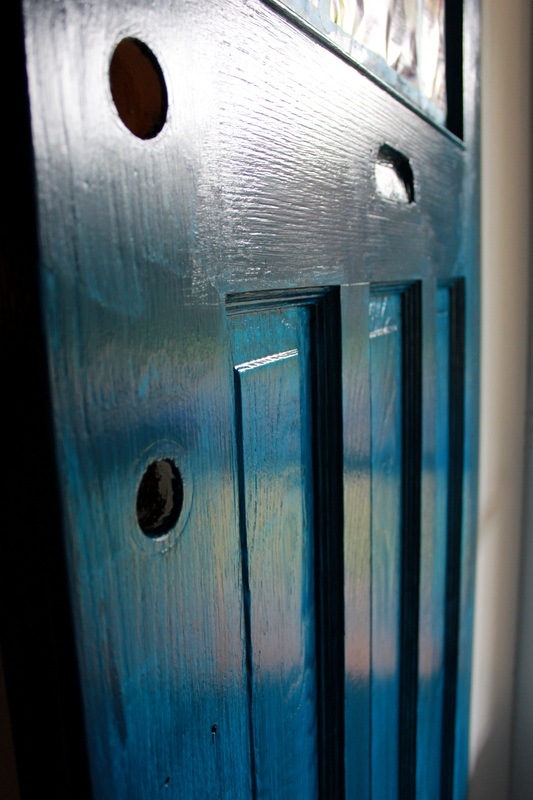
And 3 coats are done!  Love that I can still see the grain of the wood.
We also sealed up the letter box as it was a bit open and without the screen would let winter weather in (COLD).
Picture
As usual, my photo-editing address-removal skills are incredible, haha.
It's definitely bright, though it doesn't seem this bright in real life.  
Still need to take some inside pictures with natural light.
Picture
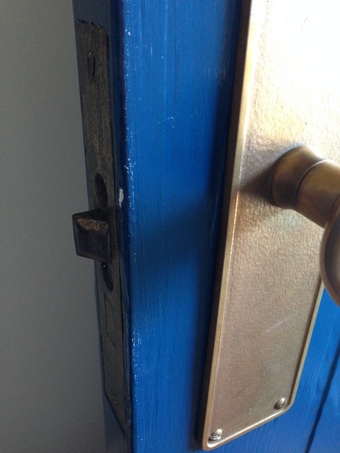
Problem a few days later - the white paint from the frame is transferring to our door...weird.  
It's way worse now than it was when I took this picture.
We removed the weather stripping which we thought was causing it, but nope.  Going to have to figure that one out.

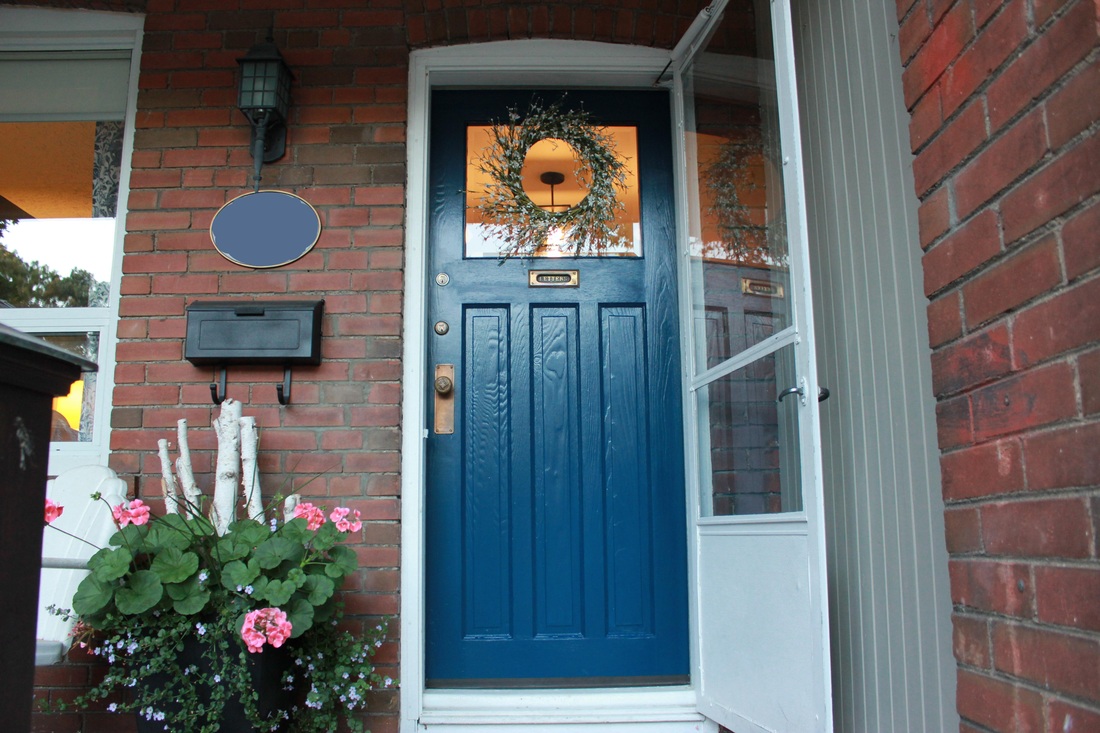
Next project - remove the screen door permanently and fix the door frame.  Also re-paint all the trim around the door and window.  Next Spring we'll also strip the paint from the porch and stain it well, as the brown paint that's on it from the old owners is majorly chipping.  I also need to get some Fall mums, though the geraniums in the planter are still growing like crazy and I never remember to water them.  
Picture
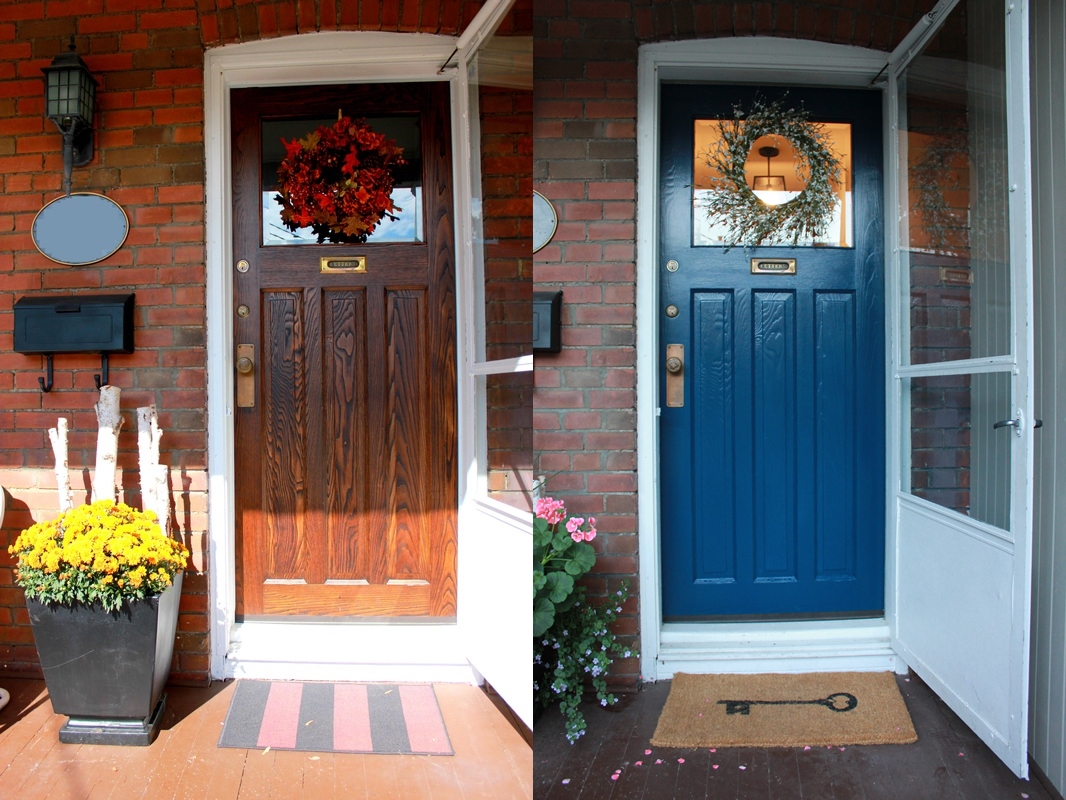
But for now, I'm happy with my Marine Blue door!
2 Comments

Little Kitchen Shelf

7/7/2014

0 Comments

 
Just a little project I did with some extra wood from the basement.  I designed it, Matt made it, and I painted it!  I just wanted to put a little bit more of that turquoise from the butcher block and stool into the kitchen.
Picture
Here is the raw wood product
Picture
Primed
Picture
Painted
Picture
Little nook by the stairs - I'm going to die dye those spoons in the paint too, along with a few other colours.
Picture
Pulls from Anthropologie, Swan apron from Home Sense
Picture
My kitchen is getting brighter and brighter!
0 Comments

Basement Storage Project - The Rest (Mostly)

7/3/2014

1 Comment

 
So remember THIS POST when it was all about our basement storage project from the beginning?  Well our basement sat like it was at the end of that post for a LONG time.  Part of that was Mat travelling and the rest just not knowing exactly how we wanted it.  Well in May we finally came up with a plan and in June we bought the wood.  Matt honestly did all of the purchases, building, sanding, priming, and painting in 3 weeks.  He worked really fast so there are a few instagram pics along with my DSLR.  I just couldn't get down there enough to capture every moment (probably to his relief!).
Picture
Where we left off...
Picture
The plan
Picture
The purchases - pine
Picture
First off was building the base to level everything out.  Toronto houses = uneven everywhere.
Picture
Looks like a ladder
Picture
I love the pictures where he is deep in thought.
Picture
Base is secured, frame is built.
Picture
Half shelves done
Picture
Closet section secured and shelves for outdoor cushions above
Picture
Checking to see the closet doors work - Ikea closet doors made into sliding rollers
Picture
Ikea doors checked for size too!
Picture
Done!!!
Picture
Had to do the junction box and plug you can see too.  Better than the dangling one that was there before...
Picture
Last check of everything before painting
Picture
Paint prep
Picture
Primed!
Picture
Painted!  2 coats of Benjamin Moore's White Dove in Semi-gloss latex paint.
Picture
All the ledges are for adjustable shelving - none, half, or full shelves anywhere along the bottom

Next step is to do a few touch-ups, put the doors back on, and put everything away.  Touch-ups tonight, doors tomorrow, and next week will be organization central.  Thank goodness for summer holidays!!!  I'll do a complete before and after once it's all done.  Stay tuned!

1 Comment

My March Break

3/23/2014

0 Comments

 
Each year I have a few March Break goals.  Last year it was mainly to paint the kitchen and redo the grout.  Well this year I took a more relaxing approach.  It was much more enjoyable!
Picture
Picture
My goals.  Though "make bunting" was not one of them, I think it turned out nicely and matches my kitchen colours.
Picture
First night of the break we went to dinner with our friends Jeff and Liz at Goods & Provisions. 
Jeff, like me, likes to takes pictures of food.
Picture
Sunday dinner by Matt - coq au vin blanc with potatoes and bacon.
Picture
Birthday Manicure from Miyuki at Tips Nail Bar
Picture
It was tbt so I decided to do a collage of past birthday fun
Picture
Lie to me and tell me I don't look 31!
Picture
Drinks at Caren's followed by dinner at Pangaea, both in Yorkville.
Picture
Oh yeah, remember THIS CAKE?  I made that.  No big deal.
Picture
My brother and Jessica had us over for dinner the following day - pretty tulips!
Picture
Delicious salad my parents brought.  Going to modify it a bit and add quinoa for dinner tomorrow.
Picture
I said no birthday candles so instead I had to blow out a tea light from the bottom of the Eiffel Tour
Picture
Okay so many I am really proud of this cake.
Picture
Some B&Ws
Picture
Picture
Picture
See how Adam's right eye is more dilated than the left?  Yeah he got beat up by a nerf gun by a child...it's a sensitive topic.  That's why I'm writing about it here.  LOVE YOU!
Picture
Then we listened to some records - love the baby blue player!
0 Comments

Basement Storage Project - Day 1

2/24/2014

0 Comments

 
Many people lately have commented "Wow!  Do you guys ever just relax?"  I know it seems like we never rest and are constantly doing projects, but really, the last time we did anything major was December 2012, when we did the upstairs stair guard and stairs.  Matt travelled a lot this past year and I'm not versed well enough in tools to do a reno on my own.  Plus we love doing projects together.  This was the first Christmas where we didn't have any new home project to "show off" to our family which got us itching to do some projects in the new year.

So, we just finished the stairs on Family Day last Monday, and we decided yesterday (Saturday) to start on the storage, was the second half of the basement project.  The first thing we had to do was unpack all the cupboards.  We also went through everything and threw out stuff we didn't need, moved a few things to new locations, and found temporary spots for everything else.
Picture
The before.  Tidy work area from the stair project.
Picture
Even all the extra wood is organized!!!
Picture
The first cupboard held all our paint, stain, patching and sealing supplies, drop sheets, and then random stuff like bug killers, a few strong cleaners and light bulbs.  Here is their new temporary home in the laundry room.
Picture
The closet was next up.  It contained coats, extra scarves, hats and gloves, old shoes, and golf and snowboard stuff
Picture
Since the golf clubs and snowboard were already moved here when we removed the stuff from under the stairs, I just decided to keep everything together.  That duffle bag is filled with all the coats.  We obviously use this bathtub a lot...hmmm...maybe we should the bathroom as basement project round 3???
Picture
Another cupboard had a shelf of extra baking supplies and spices.  This is where they live now, haha.  I plan on making myself a lovely ombre layer cake with some fancy icing for my birthday over March Break.
Picture
All the serving stuff that doesn't fit in the sideboard upstairs was in another cupboard.  Here it all is (plus a lot of stuff from under the stairs that was already hanging out here, preventing me from doing Wii Zumba).
Picture
Of course there was a shelf filled with different liquors and whisky, plus a whole lot of empties.  That conversation went like this: Kat: "I thought I asked you to take those back at Christmas!" Matt: "Yep, and I've been ignoring you since Halloween!"  Then he dropped some and made a mess - sweet retribution!!!
Picture
Are now back to the Beer Store and a tidy sum in Matt's pocket.
Picture
*Sigh*  So much stuff.

Our second step to this project was to actually remove the cupboards from the wall and take them apart.  This actually only took just over an hour.  As long as you have a power drill it makes life easier.  By hand would be very annoying, but still possible.  We had three big shelving cupboards and one closet system.  Who knows what the walls would be like behind them!  I was hoping for the original exposed brick!!!
Picture
Removing the doors
Picture
Hmmmm were they even bolted to the wall? The answer is NO!
Picture
A sweet surprise!  A note from the owners who did the basement reno.  There is more but it's the name of the owners.  I won't show the whole message to protect their privacy.  I do intend, however, to photograph and frame the note so I don't feel as bad painting over it!  No luck with the brick - it was painted white behind.
Picture
Looks so empty now!
Picture
Since we don't have extra tile, it is lucky that our new cupboards will be a bit deeper than the original ones, and will be build right over top and beyond the edge of tile.  It's pretty gross, though!

The next step will decide how exactly we want to organize the new system.  Roughly we will have cupboards on the bottom half, similar to the sideboard in the dining room.  The top half will be open shelving.  The triangle under the stairs will be all shelves.  It will all probably be painted white, and we'll use Ikea doors on the bottom half, but build the cupboards ourselves.  We want to make sure we will have a long closet on the end for all our extra coats and shoes (as we don't have a main floor closet), and we also have to be able to store our suitcases, golf clubs, snowboard, Matt's guitar, all our Christmas and holiday decorations, and all the random house stuff you've seen spread around my basement!!!
0 Comments

Belated Valentine's Day 2014

2/23/2014

2 Comments

 
Matt and I don't really do a lot usually for Valentine's Day.  We don't do cards or gifts.  In the past we've gone to Leaf games, but mostly we just cook a good meal and enjoy each other's company.  That's exactly what we did this year.  I did a bit of prep work this time - I made a chocolate terrine  for dessert (since I failed on New Years) on Thursday evening - it has to set 12-24 hours.  I also made one for my work wife, Marta! Other than that, I just set the table when I got home on Friday, made a little garland (honestly took me 10 minutes) and Matt cooked dinner (pomegranate balsamic glazed sirloin steak with kale and tricolour quinoa).
Picture
Picture
Cut strips of scrapbook paper, staple 2 ends together, pinch top of one and staple.
Connect by the bottom staple of one heart with the top pinch of the other.  Simple and quick!
Picture
Picture
Picture
Picture
Picture
Heart napkin fold link HERE (there's is better than mine...)
Picture
Dinner prep
Picture
Final delicious product, along with a pinot noir!
Picture
Chocolate terrine!  Recipe from HERE.
Added some toasted almond slices around the edges, plus a dash of icing sugar and a pinch of sea salt.  Served with fresh whipped cream.  Let to cool in my grandmother's heart shaped baking pan.  
I cut the recipe in half as it served 12, and this did serve us 3 times, but with big pieces.  It should be served in small doses - probably could have lasted 4-5 nights, haha, but it was just so good!  Just as good as the one at our favourite restaurant, Goods and Provisions.
2 Comments

Basement Stair Project Day 10-??? & Reveal!

2/22/2014

0 Comments

 
So the ??? was actually until about Day 21.  But really there were some drying time days in there too, but so far I've really only included days where we (who am I kidding, Matt) did work.  Not all of them were full days, but again, with painting and staining, patience is key.  Also balance and flexibility so you can take stairs two at a time holding a giant basket of laundry without falling down.

Okay so I could go through all the painting and staining progress pictures FIRST, but we all know you just want to see the final product, so here's one for you before I launch into the details:
Picture
Sorry it can't be any prettier.  The tools are not disappearing any day soon!

See Day 1-2 HERE, Day 3-5 HERE, and day 6-9 HERE.

Step 13 - Priming & Painting the Stair Guard & Risers
Picture
Day 10 - Basic priming of the stair guard, posts, and risers.  Nothing crazy - just primer and paintbrush!
Picture
Taping was very annoying...but necessary.
Picture
Day 11/12 - 2 coats of paint on the same parts.  We used the same paint that is on all of our trims,
Benjamin Moore White Dove semi-gloss latex.
Picture
Very pretty.  There is also a big puddle of paint just out of sight that Matt spilled, haha.

Step 14 - Gluing the Stairs
Day 13/14 - We had to attach the stairs over two days because we wanted the glue (construction adhesive) to be completely dry before stepping on them.  It was weird to step on them because with and without the stairs they were different levels - it really throws you off when walking down them!
Picture
First Day
Picture
Second Day

Step 15 - Staining the Stairs
Day 15-21.  Since laundry and storage were in the basement, we had to do every other stair like we did upstairs when painting and staining.  The stairs started with pre-stain to help the stain soak in, then we did 2 coats on stain using Minwax "Golden Pecan" and followed by 3 coats of glossy Minwax oil-modified (more water-based) polyurethane.  There were some days where Matt did a coat in the morning and a coat at night, so it took 3 days for each half set of stairs, plus 24 hours to dry between.  After the 24 hours we pulled off the tape and did some touch-ups on the paint.
Picture
Zebra stripes of stain!
Picture
With the polyurethane coats
Picture
Allllllll done!!!!!!!
Picture
Matches the rail perfectly
Picture
Nice clean lines
Picture
Now if only the tools could get put away...but no such luck - we're tackling those cupboards soon.
Picture
So much better than the gross dingy carpet!
Picture
After a bit of tidying just this morning - basement is very organized...in its own way.
Picture
Gotta love the before and after!  

See Day 1-2 HERE, Day 3-5 HERE, and day 6-9 HERE.

Project Done.  So Next Up?
- take everything out of storage cupboards (actually did this this morning!)
- tear down the cupboards (may do that later today or tomorrow - excited!!!)
- paint (may possibly need to prime) the brick wall behind the stairs
- plan the storage cupboards and open shelving system
- build the storage system (and a million more details go into this)
0 Comments

The Butcher Block Goes Glam

1/28/2014

2 Comments

 
Another of my January Cure projects was to (finally) paint and stain our butcher block island in the kitchen.  I have a few Pins saved with stain on the top and paint on the rest in various colours.  Took me a while to decide on what I wanted to do, but here is what I decided:
Picture
Ahhhhh it makes me so happy to see the bright colours all done!  This is the Bekvam Kitchen Cart from Ikea by the way. I decided that I would also do the step stool (Bekvam from Ikea as well) I had yet to assemble as well:
Picture
So here's the project, in pictures, of course!
Picture
Day 1 - Disassemble the island and open up the step stool package.  The parts to be painted I left to the side and all the parts to be stained I laid out and raised up.  I was forced to the upstairs guest room since the basement work is already taking up all that space down there.
Picture
I applied a thin coat of Minwax Pre-stain to the side I was staining.  You only have to wait 20 minutes and then you can stain within two hours.  It just helps the stain adhere.  I used Minwax Polyshades in Classic Oak with a satin finish.  It will end up being a bit shiny but I didn't want it glossy.
Picture
This is after one coat of stain on the top and sides.  I used a small foam brush.  If I did it again I would have sanded the pieces first - they were more raw wood than I thought they would be.
Picture
Just to compare - here's the bottom side before...
Picture
...and the top I just finished.
Picture
Matt snuck a photo.  Only fair as I snap them all the time.  Yep, I look super attractive with Matt's baggy old sweats and t-shirt.  It's the weekend, okay?  Oh yeah, I'm also wearing gloves.  This is not at all necessary except if you get expensive manicures that you don't want to ruin!
Picture
Once each side had a coat of stain I brought them to the basement to go over with very fine steel wool.  This gets off any of the thick drip marks and makes things nice and even.  Do this away from your work area as the steel wool sheds and leaves dust everywhere.  Wipe everything down with a damp cloth before you start the next coat so nothing is left sticking to it.
Picture
Once all the coats are done (I did two one the bottom side and three on the top sides), it is time to buff and polish.  Matt taught me his full polishing method that I doubt is completely necessary but they looked great in the end!
First step - super fine wet sandpaper and baby oil.  Again takes off any excess stuff and smooths it out.
Picture
Second coat is the heavy duty cleaner.  It's orange and looks like stain but rubs off with a dry cloth.  Third coat is the turtle wax polishing compound that makes everything all shiny and smooth.
Picture
Left is the scary red rubbing compound, right is after it was polished off.
Picture
When you are covered in stain and layers of polish, you are banned to your work room to eat dinner.
Picture
Time for the paint!  This was easier.  I'm familiar with painting.
Picture
Anyone else see a Glockenspiel?  (Sorry, "xylophone" for those non-music people)
Picture
Prime first, of course.
Picture
I picked Valspar's "Bayside" (Go Tigers!) as my paint colour.  I used a satin finish but you could go more glossy just as easily.  Typically the more sheen, the easier to wipe down, which is good in a kitchen.
Picture
Ohhhhh - Prom Dress Blue (I should find a pic of me from prom to post), or "Robin Egg Blue" as others would say. 
2 coats on each side and you're good to go!
Picture
Assembly!!!  This should have been easy but some of the paint gunked it up and it took more strength than I thought but in the end I got it done!  Note to self - tape holes beforehand.
Picture
Yay!  Yes, my floor is dusty.  The basement stairs are just to the right.  There will always be dust on the floor until that project is done.
Picture
After I yelled at the step stool for an hour while working, I got fed up and asked Matt to put the island back together.
Picture
He did good!
Picture
Double yay!  That's a speaker on the bottom, linked to our sound system in the living room.
Picture
See?  My David's tea goes perfectly.  Have cobalt blue already in the kitchen the form of TWO teapots (can you tell I heart me some tea?), so I was glad to have a vase that links the two together.  I love the sheen to the top.
Picture
I'm going to put a shelf on the wall above this that I will paint the same colour.  I'll hand that apron along with some other things from it (got the apron from Home Sense).
Picture
Those are my shelf plans, from my engineer husband!  We will use some of the extra wood from the stair project.  There will be a few hooks on the bottom half.
Picture
Also got this drying mat that matches too.  I'm going to probably do some colourful faux roman shades to bring the colour up a bit from the floor, and maybe a doormat too.
Picture
So bring and colourful!  Makes me smile each morning when I make my tea!  
It was a time-consuming project in terms of number of days (multiple sides, multiple coats) but not in terms of time each day (about an hour max).
Proud of this project - hope you like it!
2 Comments

Basement Stair Project Day 6-9

1/27/2014

0 Comments

 
Last weekend Matt worked on building the stair guard and we left off with this photo:
Picture

Step 10 - Filling & Smoothing
This week was all about touch-ups.  Using wood-filler and poly-fill to fill gaps, sanding, cleaning, etc.  I assigned that as "Day 6", though it was probably done over 2-3 days just for an hour each evening getting things perfect.  At the end of last weekend
Picture
All the screw holes filled, sanded, filled again, sanded again before painting next week.
Notice the empty light switch box?  Matt moved that last weekend too!
Picture
Step 11 - Cut & Attach Risers
Day 7 - I'm using the term "risers" for the vertical parts of the stairs.  We bought riser and stair kits (stair refinishing kit?) from Lowes that go right over plywood.  You only need to cut to size.  The good thing about them is that they have a lip that goes in the front. These pieces are also thin and have a good finish.  Also the biggest thing?  WAYYYY cheaper than buying oak and cutting it to size.
Picture
Each kit was normally $40 but we got them on sale for $20 each!!!  Needed 12 kits.
Picture
The outer piece is the new riser (the other the original plywood).
Picture
As usual this boy works incredibly fast.  
Had them all cut to size and screwed in (we need to invest in a nail gun!) in an hour!
Picture
Picture
Done!
Step 12 - Cut Stairs to Size
Day 7/8 - The flat pieces to the stairs I'm just calling "stairs".  If I called them "risers" for the vertical, does that make these the "runs?"  That's a little math humour for you...yes I am a geek.  You should already know that.  The reason that cutting to size and assembly are not lumped into one is because we are going to paint all the risers and wood at once and stain the stairs separately before attaching.
Picture
Stairs are just sitting there to ensure the correct size.  Matt numbered each stair and piece to make sure he knew which piece was for what.  He cut the length (left to right) for all the stairs when he did the risers, and this cutting was for depth of the stair.
Picture
OoooOOOOOoooohhhhh...pretty!
Picture
See how the bottom stair has that teeny space on the left between the riser and stair?  
Yeah that's driving Matt crazy.  He measured perfectly but our house is never easy so that happens some times.  
Hopefully nothing a little wood filler can't fix!!!
Picture
Screws for the risers were strategically placed to be covered by the stairs.
Picture
Nothing like a man covered in saw dust using a saw on a stand with another saw.
Picture
Explaining to me how to make the top flush with the floor.
It's the connection piece between the tile and wood so that you don't trip.
**See my turquoise step stool??? Post to come!!!**
Picture
Admiring his work.  Sad to take them off moments later as they all need to be stained! They look so pretty!
Picture
Looking good!
Next Steps?
- Prime and paint the risers and all the stair guard - using our go-to trim white - Benjamin Moore's "White Dove".  It's the colour of the risers and balusters upstairs too.
- Touch ups to the wall paint where any filler went.  The basement colour is BM's "Moonshine."  It's more from moving the lighting than the stairs, but it will be done while we are painting everything else.
- Pre-stain, stain (x 2), and verathane (x 3) the stair pieces
- Attach the stair pieces to the, well, stairs.
- Touch ups (there is always touch-ups)
- Admire briefly before starting the basement storage project!!!
0 Comments

Basement Stair Project Day 3-5

1/18/2014

0 Comments

 
When we last left off, we had removed the basement stair carpet, sawed off the sides that stuck out, and reinforced the top to the joist.  Last weekend (and one weekday this week) we tackled sawing off the fronts that stuck out, building the stair guard, including the newel post and balusters.  Here's what it looked like shortly before that:
Picture
Last Saturday morning, right before the work began
Picture
Need to saw off those edges to fit on the new wood on top properly

Step 5 - Cutting the Stair Edges on the Front
Picture
Day 3 - Measuring and drawing straight lines
Picture
And cut away!  Couldn't circular saw all the way to the edge so had to hand saw a bit too (hard labour!)
Picture
Half done!
Picture
DONE!

Step 6 - Paint Touch-Ups
Picture
I offered to do this but he was in the zone - just a few touch ups from when we took the carpet out and there was missing paint (well it was a different colour) - if only we could see the original brick!!!

Step 7 - Cutting & Securing the Newel Post
Picture
Day 4 - Preparing the newel post.  We used pine for all the stair guard.
I realized that I probably should not be down here if Matt was wearing a mask to avoid the dust, haha.
Picture
An hour later it was installed!  
It was attached to the stairs and there is a bit of glue underneath so it won't slide around on the tile
Picture
"Matt?  You're not dead, right?"

Step 8 - Cut & Assemble the Stair Guard
Picture
Also added wood to the side - this is piece one of two.
Picture
Lookin' good!
Picture
"Matt are you sure this is level?"
"YES!!!"
Picture
"Matt, you're an engineer right?"
"Ya"....
Picture
..."but I can see you through this crack!!!!"
Oops!  Will need to fill that.  Then I continued to mock him until he kicked me off the stairs, haha.
Picture
Second side of wood in, and top stair guard too.
Seriously, I leave for a half hour and things go very quickly downstairs.  Sorry I don't have more pictures!
Picture
View from straight on  I like the very clean look.
Picture
Okay, end of day 4!

Step 9 - Adding the Balusters
Picture
Day 5 - More engineering plans - oh Matty I love your clever but geeky style!
Picture
I didn't take pictures of measuring everything out, and again after an hour he was half done already!
Picture
This perfectly captures Matt at work.
Picture
Still very clean looking.  I'm not a fan of curly curvy balusters.
Picture
This assembly was a lot easier than upstairs when they had to be put into the ground.
I didn't think I would like the balusters on the outside look, but I really don't mind it at all.
Picture
Here's a shot of the bolts attaching the post to the stairs that I took later.
Wow I really need to clean and grout renew!!!
Picture
Matt didn't like that the top one was a bit closer than the rest.  So he removed a little angled piece so the last baluster would be evenly spaced.  Perfection!
Picture
Before & Progress!!!
Doesn't look like much but at least it's a lot safer so far!

Matt hasn't done any work on the stairs since Tuesday, though he did spend two hours at home depot today getting a few things he needed.  The light switch for the basement is going to be moved higher (right now it is about half-way down the stairs), plus we got a nest thermostat (!!!!) that he's going to install, and switch out a few of the un-matching light switches.
Picture
See how the light stairs at stair level instead of at eye-level?  Very annoying when you have your hands full with laundry and you have to balance half-way down the stairs to turn it on.

Next Stair Project Goals?
- Wood filler where needed
- Cut and install the rise pieces - vertical parts to the stairs
- Paint the rise pieces
- Cut and stain the flat stair pieces
- Paint the stair guard
- Install the flat stair pieces

We'll probably get this project done by the end of next week because I can help with all the painting.  And don't think I've been doing nothing!  I've stained the tops of the butcher block island and started painting the sides.  Still have one more coat, then I'll assemble.  Can't wait to share this project!!!
0 Comments
<<Previous

    Kathleen

    Adventures in married life, cooking, teaching science and new home renovations in the city!

    Picture

    Links

    Pinterest Page 
    Wedding Planning Site

    Archives

    November 2014
    October 2014
    September 2014
    August 2014
    July 2014
    April 2014
    March 2014
    February 2014
    January 2014
    October 2013
    September 2013
    August 2013
    July 2013
    June 2013
    May 2013
    April 2013
    March 2013
    February 2013
    January 2013
    December 2012
    November 2012
    October 2012
    September 2012
    August 2012
    July 2012
    June 2012
    May 2012
    April 2012
    March 2012
    February 2012
    January 2012
    December 2011
    November 2011
    October 2011
    September 2011
    August 2011
    July 2011
    June 2011
    May 2011
    April 2011
    March 2011
    February 2011
    January 2011
    December 2010
    November 2010
    October 2010
    September 2010
    August 2010

    Categories

    All
    Baby
    Backyard
    Basement
    Bathroom
    Bedroom
    Books
    Condo
    Cooking
    Cottage
    Decor
    Dining Room
    Diy
    Family
    Fitness
    Friends
    Furniture
    Gardening
    Getaway
    Hallway
    Holidays
    House Hunting
    House Issues
    Inspiration
    Instagram
    January Cure
    Kitchen
    Lighting
    Living Room
    Married Life
    Moving
    Organization
    Painting
    Photography
    Pinterest
    Politics
    Renovation
    Shopping
    Teaching
    Wedding